Running and Quitting
Last updated on 2025-11-27 | Edit this page
Estimated time: 15 minutes
Overview
Questions
- How can I run Python programs?
Objectives
- Open a VSCode project.
- Create a Python script.
- Create a Jupyter notebook.
- Understand the difference between a Python script and a Jupyter notebook.
- Create Markdown cells in a notebook.
- Create and run Python cells in a notebook.
In this workshop we will look at two options on how to run Python code: non-interactively via Python scripts and interactively via Jupyter Notebooks. Jupyter notebooks are common in data science and visualization and serve as a convenient common-denominator experience for running Python code interactively where we can easily view and share the results of our Python code.
There are diverse ways of editing, managing, and running code. Software developers often use an integrated development environment (IDE) like PyCharm or Visual Studio Code (VSCode), or text editors like Vim or Emacs, to create and edit their Python programs. After editing and saving your Python programs you can execute those programs within the IDE itself or directly on the command line. In this workshop we will use VSCode to explore Python scripts as well as Jupyter notebooks. In contrast to Python scripts, Jupyter notebooks let us execute and view the results of our Python code immediately within the notebook.
Jupyter notebooks have several other handy features:
- It allows you to annotate your code with links, different sized text, bullets, etc. to make it more accessible to you and your collaborators.
- It allows you to display figures next to the code that produces them to tell a complete story of the analysis.
Each notebook contains one or more cells that contain code, text, or images.
To learn more about the origin of Jupyter notebooks and how to use them with Jupyterlab, see the JupyterLab based version of this lesson: Software Carpentry: Plotting and Programming with Python
Getting Started with VSCode
VSCode is an integrated development environment (IDE), with extensive features for diverse programming languages. You can add functionality for (almost) anything using VSCode Extensions.
If you have not already installed the Python and
Jupyter extensions or didn’t set up the VSCode workspace
for this workshop, see the workshop website for install
instructions.
Setup a Python script
Open the workshop workspace in VSCode and create a
script-1.py file. Add a line
print('Hello world') in the file and run it using the
Run Python file button on the top right of the VSCode
window.
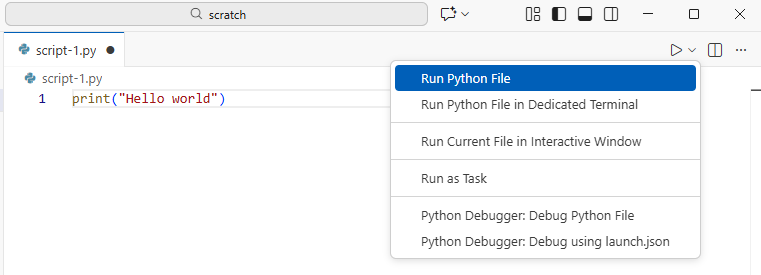
This will open an output terminal panel and display
Hello world in it.
Congratulations! You just ran your first Python script!
Setup a Jupyter notebook
In the VSCode workspace create a notebook-1.ipynb file.
The extension ipynb is short for Interactive
Python Notebook.
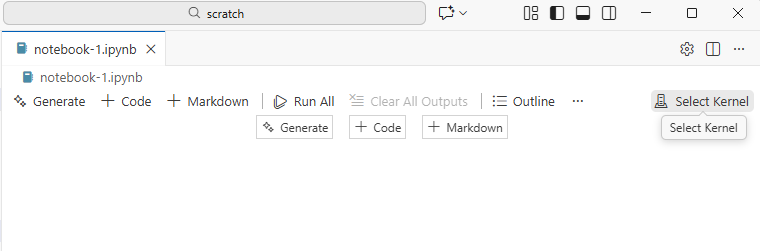
The VSCode interface provides additional options for the jupyter
notebook file in comparison to the Python script. Instead of running the
file directly as a Python script, for a Jupyter notebook we need to
select which Jupyter kernel we want to use to run this notebook. Click
on the Select Kernel and select the Python environment you
created in the setup for this workshop. This will start a jupyter kernel
in the background, so you can execute the content of the Jupyter
notebook.
To run Python code in a Jupyter notebook, add a code cell
(+Code button) and add print("Hello World")
into the new cell. To execute the cell, click the
Execute Cell button or press Ctrl+Alt+Enter.
The output is printed directly below the cell.
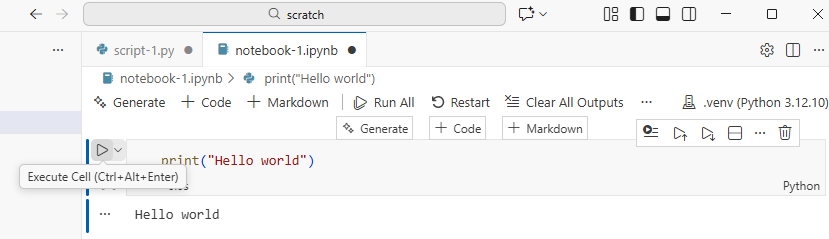
Congratulations! You just ran your first Python command in a Jupyter notebook!
Menu Bar
The VSCode Menu Bar has the top-level menus that expose various actions for file options and editor configuration which are useful independent of the language you are working with. In many cases those commands also come with pre-defined keyboard shortcuts indicated on the right side of the option field. A short overview of VSCode menus
- File: Actions related to files and directories such as New, Open, Close, Save, etc. as well as general editor settings and preferences.
- Edit: Actions related to editing documents and other activities such as Undo, Cut, Copy, Paste, etc.
- View: Actions that alter the appearance of VSCode.
- Run: Actions for running code in different activities such as notebooks and code consoles (discussed below).
- Help: A list of VSCode help links.
Kernels
To run code in the Jupyter notebook it is necessary to select a kernel. Here we used the Python environment we set up earliet. In general Jupyter docs define kernels as “separate processes started by the Jupyter server that runs your code in different programming languages and environments.” So when we assign the Python interpeter as kernel, that starts a kernel - a process - that is going to run the code. The kernel is not necessarily a Python process, but exist in for a number of languages. Using other Jupyter kernels for other programming languages would let us write and execute code in other programming languages in the same interface, like R, Java, Julia, Ruby, JavaScript, Fortran, etc.
How It’s Stored
- The notebook file is stored in a format called JSON.
- Just like a webpage, what’s saved looks different from what you see in your browser.
- But this format allows Jupyter to mix source code, text, and images, all in one file.
Code vs. Text
Jupyter notebooks mix code and text in different types of blocks, called cells. We often use the term “code” to mean “the source code of software written in a language such as Python”. A “code cell” in a Notebook is a cell that contains software; a “text cell” is one that contains ordinary prose written for human beings.
The Notebook has Command and Edit modes.
- If you press Esc and Return alternately, the outer border of your code cell will change from highlighting the cell itself to highlighting the cell content.
- These are the Command (cell) and Edit (content) modes of your notebook.
- Command mode allows you to edit notebook-level features, and Edit mode changes the content of cells.
- When in Command mode (esc/gray),
- The b key will make a new cell below the currently selected cell.
- The a key will make one above.
- The x key will delete the current cell.
- The z key will undo your last cell operation (which could be a deletion, creation, etc).
- All actions can be done using the menus, but there are lots of keyboard shortcuts to speed things up.
Use the keyboard and mouse to select and edit cells.
- Pressing the Return key turns the border blue and engages Edit mode, which allows you to type within the cell.
- Because we want to be able to write many lines of code in a single cell, pressing the Return key when in Edit mode (blue) moves the cursor to the next line in the cell just like in a text editor.
- We need some other way to tell the Notebook we want to run what’s in the cell.
- Pressing Shift+Return together will execute the contents of the cell.
- Notice that the Return and Shift keys on the right of the keyboard are right next to each other.
The Notebook will turn Markdown into pretty-printed documentation.
- Notebooks can also render Markdown.
- A simple plain-text format for writing lists, links, and other things that might go into a web page.
- Equivalently, a subset of HTML that looks like what you’d send in an old-fashioned email.
- Turn the current cell into a Markdown cell by entering the Command mode (Esc/gray) and press the M key.
-
In [ ]:will disappear to show it is no longer a code cell and you will be able to write in Markdown. - Turn the current cell into a Code cell by entering the Command mode (Esc/gray) and press the y key.
Markdown does most of what HTML does.
| Markdown code | Rendered output |
|---|---|
|
|
|
|
|
|
|
A Level-1 Heading |
|
A Level-2 Heading (etc.) |
|
Line breaks don’t matter. But blank lines create new paragraphs. |
|
Links are created with
|
Creating Lists in Markdown
Create a nested list in a Markdown cell in a notebook that looks like this:
- Get funding.
- Do work.
- Design experiment.
- Collect data.
- Analyze.
- Write up.
- Publish.
This challenge integrates both the numbered list and bullet list. Note that the bullet list is indented 2 spaces so that it is inline with the items of the numbered list.
1.  Get funding.
2.  Do work.
    *   Design experiment.
    *   Collect data.
    *   Analyze.
3.  Write up.
4. Publish.Change an Existing Cell from Code to Markdown
What happens if you write some Python in a code cell and then you switch it to a Markdown cell? For example, put the following in a code cell:
And then run it with Shift+Return to be sure that it works as a code cell. Now go back to the cell and use Esc then m to switch the cell to Markdown and “run” it with Shift+Return. What happened and how might this be useful?
Equations
Standard Markdown (such as we’re using for these notes) won’t render equations, but the Notebook will. Create a new Markdown cell and enter the following:
$\sum_{i=1}^{N} 2^{-i} \approx 1$(It’s probably easier to copy and paste.) What does it display? What
do you think the underscore, _, circumflex, ^,
and dollar sign, $, do?
The notebook shows the equation as it would be rendered from LaTeX
equation syntax. The dollar sign, $, is used to tell
Markdown that the text in between is a LaTeX equation. If you’re not
familiar with LaTeX, underscore, _, is used for subscripts
and circumflex, ^, is used for superscripts. A pair of
curly braces, { and }, is used to group text
together so that the statement i=1 becomes the subscript
and N becomes the superscript. Similarly, -i
is in curly braces to make the whole statement the superscript for
2. \sum and \approx are LaTeX
commands for “sum over” and “approximate” symbols.
- Python scripts are plain text files.
- Use the Jupyter Notebook for editing and running Python.
- The Notebook has Command and Edit modes.
- Use the keyboard and mouse to select and edit cells.
- The Notebook will turn Markdown into pretty-printed documentation.
- Markdown does most of what HTML does.